Golfing
Playing Golf
Before you play golf, you should charge the device (Charging the Watch).
-
Select
 to keep score.
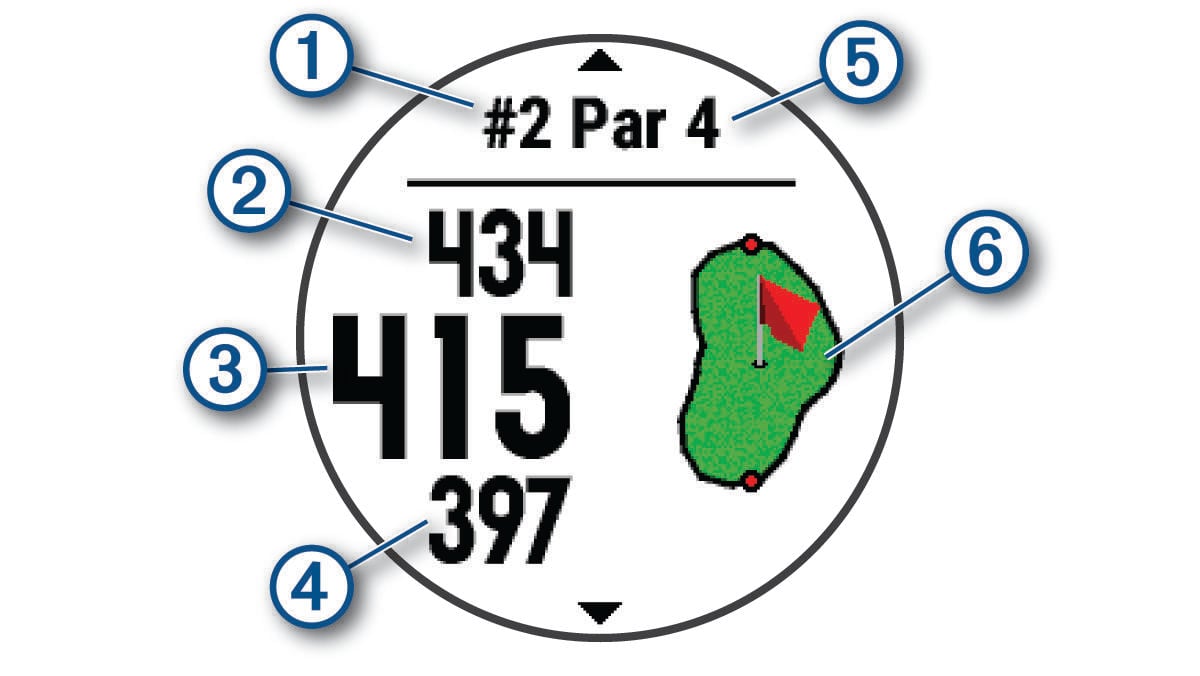
Hole Information
The watch calculates the distance to the front and back of the green, and to the selected pin location (Moving the Flag).
|
|
Current hole number |
|---|---|
|
|
Distance to the back of the green |
|
|
Distance to the selected pin location |
|
|
Distance to the front of the green |
|
|
Par for the hole |
|
|
Map of the green |


Golf Menu
During a round, you can press START to view additional features in the golf menu.
- End Round
-
Ends the current round.
- Pause Round
-
Pauses the current round. You can resume the round at any time by starting a Golf activity.
- Move Flag
-
Allows you to move the pin location to get a more precise distance measurement (Moving the Flag).
- hazards
-
Shows the bunkers and water hazards for the current hole.
- Measure Shot
-
Shows the distance of your previous shot recorded with the Garmin AutoShot™ feature (Viewing Measured Shots). You can also manually record a shot (Manually Measuring a Shot).
- Layups
-
Shows the layup and distance options for the current hole (par 4 and par 5 holes only).
- Scorecard
-
Opens the scorecard for the round (Keeping Score).
- Odometer
-
Shows the recorded time, distance, and steps traveled. The odometer automatically starts and stops when you start or end a round. You can reset the odometer during a round.
- PinPointer
-
The PinPointer feature is a compass that points to the pin location when you are unable to see the green. This feature can help you line up a shot even if you are in the woods or in a deep sand trap.
NOTE: Do not use the PinPointer feature while in a golf cart. Interference from the golf cart can affect the accuracy of the compass. - Club Stats
-
Shows your statistics for each golf club, such as distance and accuracy information. Appears when you pair Approach® CT10 sensors or enable the Club Prompt setting.
Moving the Flag
You can take a closer look at the green and move the pin location.
Viewing Measured Shots
Before the device can automatically detect and measure shots, you must enable scoring.
Your device features automatic shot detection and recording. Each time you take a shot along the fairway, the device records your shot distance so you can view it later.
Manually Measuring a Shot
You can manually add a shot if the watch doesn't detect it. You must add the shot from the location of the missed shot.
- Take a shot and watch where your ball lands.
- From the hole information screen, press START.
- Select Measure Shot.
- Press DOWN.
-
Select
Add Shot > .
- If necessary, enter the club you used for the shot.
- Walk or drive to your ball.
The next time you take a shot, the watch automatically records your last shot distance. If necessary, you can manually add another shot.
Viewing Layup and Dogleg Distances
You can view a list of layup and dogleg distances for par 4 and 5 holes. Custom targets also appear in this list.
Club Sensors
Your watch is compatible with Approach CT10 golf club sensors. You can use paired club sensors to automatically track your golf shots, including location, distance, and club type. See the owner's manual for your club sensors for more information (garmin.com/manuals/ApproachCT10).
Keeping Score
Updating a Score
Setting the Scoring Method
You can change the method the device uses to keep score.
-
From the hole information screen, hold
 .
.
- Select the activity settings.
- Select Scoring Method.
- Select a scoring method.
About Stableford Scoring
When you select the Stableford scoring method (Setting the Scoring Method), points are awarded based on the number of strokes taken relative to par. At the end of a round, the highest score wins. The device awards points as specified by the United States Golf Association.
The scorecard for a Stableford scored game shows points instead of strokes.
|
Points |
Strokes Taken Relative to Par |
|---|---|
|
0 |
2 or more over |
|
1 |
1 over |
|
2 |
Par |
|
3 |
1 under |
|
4 |
2 under |
|
5 |
3 under |
Setting Your Handicap
-
From the hole information screen, hold
.
- Select the activity settings.
- Select Handicap Scoring.
-
Select a handicap scoring option:
-
To enter the number of strokes to be subtracted from your total score, select Local Handicap.
-
To enter the player's handicap index and the course slope rating used to calculate your course handicap, select Index/Slope.
-
- Set your handicap.
Enabling Statistics Tracking
The Stat Tracking feature enables detailed statistics tracking while playing golf.
-
From the hole information screen, hold
.
- Select the activity settings.
- Select Stat Tracking.
Recording Statistics
Before you can record statistics, you must enable statistics tracking (Enabling Statistics Tracking).
Using the Golf Odometer
You can use the odometer to record the time, distance, and steps traveled. The odometer automatically starts and stops when you start or end a round.
- From the hole information screen, press START.
- Select Odometer.
- If necessary, select Reset to reset the odometer to zero.
Viewing the Direction to the Pin
The PinPointer feature is a compass that provides directional assistance when you are unable to see the green. This feature can help you line up a shot even if you are in the woods or in a deep sand trap.