Preparing for a Shot

CAUTION

Failing to take one or more of the following actions could result in possible property damage or personal injury while using the device indoors:

  • Ensure there is adequate ceiling height and that no objects can obstruct your backswing or follow through.

  • Ensure that any net or impact screen is set up with adequate free space behind the net or screen.

  • Ensure that any net or impact screen is high enough and extended enough to account for high-lofted shots or any errant shots.

  • Ensure that any net or enclosure frame is padded to help reduce ball ricochet.

  1. Place the ball at the desired tee location.
    NOTE: The tee location must be at least 8 ft. (2.4 m) away from the net when playing indoors.
  2. Attach the launch monitor to the tripod mount (Installing the Magnetic Tripod Mount).
  3. Place the launch monitor on the ground between 6 ft. and 8 ft. (1.8 m and 2.4 m) behind the tee location.
    NOTE: If you are using a golf mat, make sure the bottom edge of the launch monitor sits above the mat.
  4. Adjust the launch monitor so the red alignment line is aligned with the tee location and the target of the shot.
    TIP: You can lay a golf club on the ground between the alignment line and tee location to confirm they are lined up.
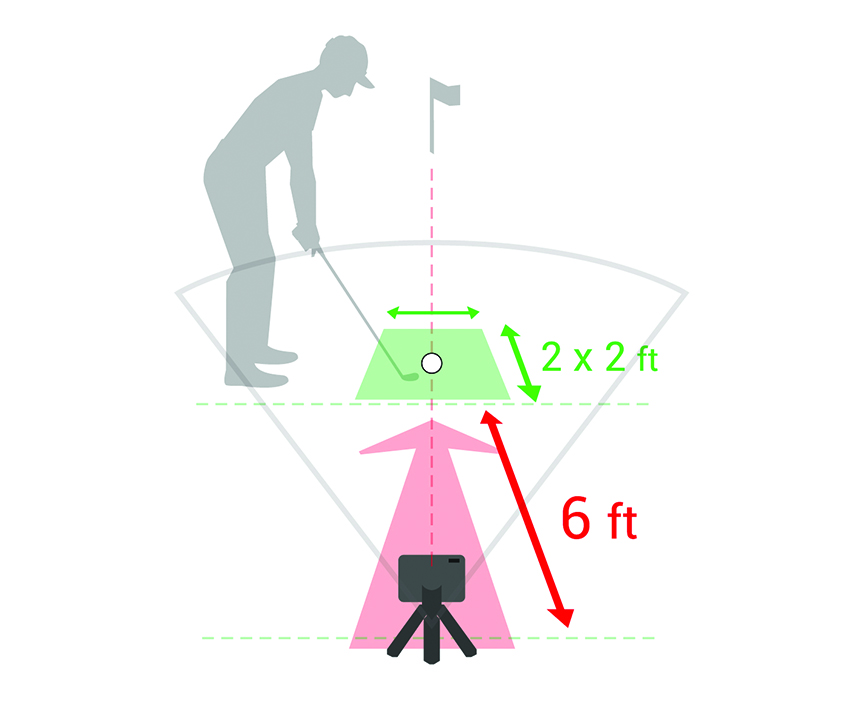
  5. If necessary, you can move the tee location up to 1 ft. (0.3 m) on either side of the target line, within a 2 x 2 ft. (0.6 x 0.6 m) hitting area that begins 6 ft. (1.8 m) from the launch monitor.

    This may be helpful if your tee location becomes worn during a golf simulator game mode session.

    NOTE: The ball and club angles are measured parallel to the target line.

    Diagram of the target line alignment with callouts
  6. Press the button to turn on the launch monitor.
  7. Start a golf simulator game mode (Using the Golf Simulator Features).
  8. Wait for the status LED to begin flashing green, and take a shot.
Copyright © Garmin. All rights reserved.GUID-E2BBF6BE-4276-436F-B697-59ABEFD61933 v2