Installing the Transducer on a Trolling Motor Barrel

Labels identifying the parts bags required for this procedure:

Bag label B Bag label C
NOTICE

You must secure the transducer cable to the shaft or other secure location during installation. Damage to the transducer cable wires or cable jacket can cause transducer failure.

  1. Remove the rubber liner from parts bag Bag label C.
  2. Remove the hose clamp and trolling motor barrel mount from parts bag Bag label B.
  3. Insert the hose clamp 1 through the slot on the trolling motor mount 2 until equal lengths extend on both sides of the mount.
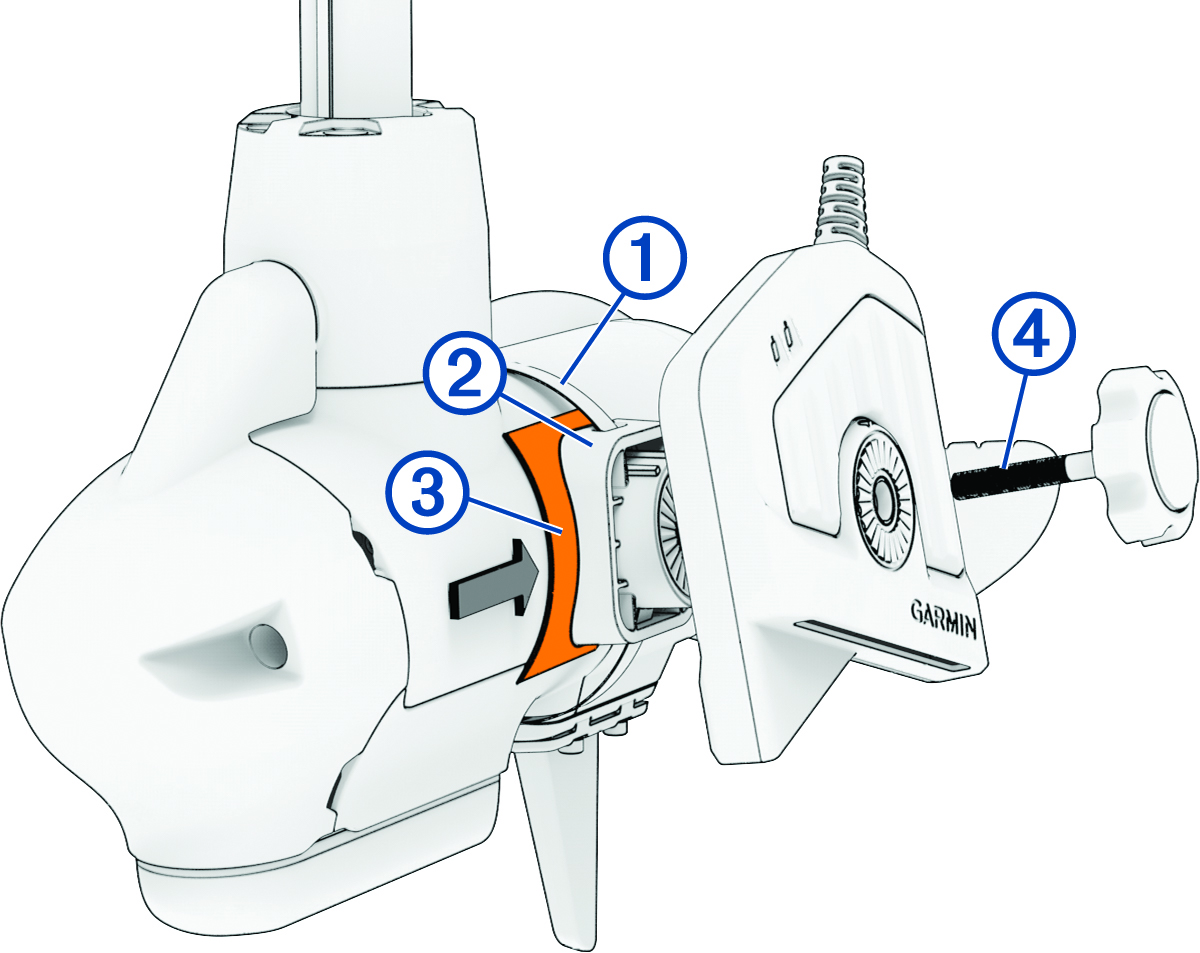
    Transducer assembly with callouts
  4. Place the rubber liner 3 against the trolling motor barrel where you plan to secure the mount.
  5. Identify the arrows on the inside of the trolling motor barrel mount that should point upward when the mount is installed.
  6. Secure the hose clamp around the trolling motor barrel using a flat screwdriver or 8 mm wrench or socket, making sure the barrel mount is oriented in the correct direction.
  7. Remove the knob from parts bag Bag label C.
  8. Attach the transducer to the mount using the knob 4, and tighten the knob by hand.
    NOTE: You can secure the transducer to the mount using the included low-profile hardware instead of the knob if you do not plan to switch transducer modes frequently during use (Installing the Transducer Using Low Profile Mounting Hardware).
  9. Secure the transducer cable to the motor shaft or other secure location while taking these precautions.
    • You must route the cable so it does not come in contact with the propeller when the trolling motor is operating.

    • You should not route the cable close to electrical wires or other sources of electrical interference.

    • You must route the cable so it is not pinched when the trolling motor is deployed or stowed.

    NOTE: If necessary, you can connect an optional extension cable, available at buy.garmin.com or from your Garmin® dealer.
  10. Position the transducer to your preferred angle (Viewing Modes).
GUID-9C83E43A-D15D-4D48-9AF6-AF0CBFA49D98 v2
July 2026