Overhauling the Rally Pedals

You can disassemble and reassemble the pedal spindles to clean and grease the components.

NOTICE

Garmin® recommends changing one pedal at a time taking care to keep track of the small screws and seals. You must obtain a 4 mm hex key, PH 00 screwdriver, 15 mm pedal wrench, 12 mm socket with an outer diameter that is less than 17 mm (typically a 1/4 in. drive) on a torque wrench, and bike grease. Use care not to damage any of the Rally™ components.

NOTE: If you have the single-sided Rally system, the right pedal has no battery carriage.
  1. Use a 15 mm pedal wrench to remove the pedals.
    NOTE: The left pedal spindle has a left-handed (reverse) thread attaching it to the crank arm.
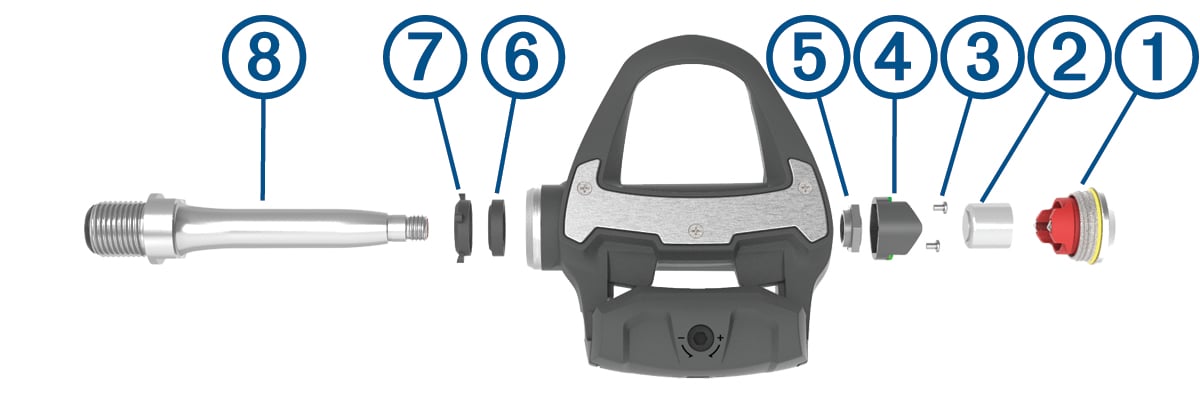
  2. Use a 4 mm hex key to remove the battery cover Callout number one.

    Device with a hex key and a glyph
  3. Set the battery cover and battery Callout number two aside.

    Exploded view of the device with glyphs
  4. Use a small Phillips screwdriver (PH 00) to remove the two screws Callout number three from inside the battery carriage Callout number four.
  5. Remove the battery carriage.
  6. While securely holding the wrench flats with a pedal wrench, use the 12 mm socket wrench to unscrew the spindle nut Callout number five.
    NOTE: The right pedal has a black spindle nut and a reverse thread. The left pedal has a silver spindle nut. The left spindle has a line on the wrench flats.
  7. Slide the spindle out of the pedal body.
  8. Remove the inner seal Callout number six and outer seal Callout number seven from inside the pedal body.
    NOTE: Both seals are cone shaped to fit the tapered spindle Callout number eight.
  9. Remove all old grease from the components.
  10. Insert the inner seal into the pedal body.

    You should press it down so it is flush with the bearing.

  11. Slide the outer seal on to the spindle.
  12. Apply bike grease to the bearing inside the pedal body.
  13. Apply a layer of bike grease to the spindle.
  14. Insert the spindle into the pedal body.

    The outer seal and the top of the spindle should be flush with the pedal body cartridge.

  15. Replace the spindle nut.
  16. While securely holding the wrench flats with a pedal wrench, use the 12 mm socket wrench to torque the spindle nut to 7 lbf-ft. (10 N-m).
    WARNING

    To ensure that the spindle nut stays in place, you must tighten it to the recommended torque specification. Failure to properly tighten the nut could cause the pedal to fall off during a ride, which could result in property damage or serious bodily injury or death.

  17. Replace the battery carriage and two screws.
  18. Replace the battery and battery cover, and hand tighten it.
    NOTE: Do not damage or lose the O-ring gasket.
  19. Use a 4 mm hex key to tighten the battery cover to 3.6 lbf-ft. (5 N-m).

    The LED displays one short green flash followed by one long red flash.

  20. Install the pedals on your bike (Installing the Pedals).
Copyright © Garmin. All rights reserved.GUID-F384D11E-79B0-4D97-BB69-DD8922C20299 v4