Going Diving
NOTICE
If you store the dive computer while it is still wet, it may inadvertently turn on and drain the battery.
NOTE: The dive computer turns on automatically when it detects water. If you start a dive without turning on your dive computer, the dive computer uses the most recent surface pressure to determine depth. For the most accurate depth information, turn on your dive computer manually, especially after traveling.
- If necessary, select Dive Mode, and select a dive mode.
- Select Start Dive With.
- Review the dive setup options, and if necessary, select View All Setup to edit the dive settings (Dive Setup).
- Wait with your arm out of the water until the dive computer acquires GPS signals and GPS turns green (optional).
The dive computer requires GPS signals to save your dive entry location.
- Select Confirm.
- Descend to start your dive.
The activity timer starts automatically when you reach a depth of 1.2 m (4 ft.).
NOTE: If you start a dive without selecting a dive mode, the dive computer uses the most recently used dive mode and settings, and your dive entry location is not saved.
- Select an option:
- Press NEXT to scroll through the data screens and dive compass.
TIP: You can also double tap the device to scroll through the data screens.
- Press ENTER to view the in-dive menu.
- When you are ready to end the dive, ascend to the surface.
- Keep your arm out of the water so the dive computer can acquire GPS signals and save your dive exit location (optional).
- Wait for the DIVE END timer to count down.
NOTE: When you ascend to 1 m (3.3 ft.), the DIVE END timer begins counting down (Dive Setup). You can press ENTER, and select Stop Dive to stop the dive before the timer elapses.
The dive computer saves the dive activity.
TIP: You can view your diving history in the dive log app (Viewing the Dive Log App).
Dry off the dive computer.
NOTE: If you store the dive computer while it is still wet, it may inadvertently turn on and drain the battery.
Navigating with the Dive Compass
- During a dive, scroll to the dive compass.
NOTE: The appearance of the dive compass may vary if you view it in a data field.

The compass indicates your directional heading  .
.
- Select
 > Compass.
 - Select an option:
- To set the heading, select Set Heading.
The compass indicates deviations
 from the set heading
  .
.- To set the heading again, select Change Heading.
- To change the heading by 180 degrees, select Set to Recip.
NOTE: The compass indicates the reciprocal heading with a red mark.
- To set to a 90-degree heading left or right, select Set to 90L or Set to 90R.
- To delete the heading, select Clear Heading.
Using the Gauge Dive Stopwatch
- Start a Gauge dive.
- Press ENTER.
- Select Start Stopwatch.
- Select an option:
- To stop using the stopwatch, press ENTER, and select Stop Stopwatch.
- To restart the stopwatch, press ENTER, and select Reset Stopwatch.
Viewing Transceiver Data During a Dive
- Press NEXT to view the data screen.
TIP: You can customize the dive data screens to view the transceiver and diver dashboard data on dedicated data screens (Customizing the Data Screens).
![]()
|
|
The gas consumption estimate for your transceiver. |
|
|
The air time remaining (ATR) estimate for your transceiver. |
|
|
Your pinned transceivers and their tank pressure values. NOTE: You can customize which transceivers are displayed (Selecting Transceivers to View During a Dive). |
- Press ENTER, and select Divers to view the tank pressure values, approximate depths, and approximate distances of the paired Descent transceivers in the network.
![]()
NOTE: Not all features are available for older devices (Dive Product and Feature Compatibility).
Switching Gases During a Dive
- Start a single-gas, multi-gas, or closed-circuit rebreather (CCR) dive.
- Select an option:
- Press ENTER, select Gas, and select a backup or decompression gas.
NOTE: If necessary, you can select Add New and enter a new gas.
- Dive until you reach the MOD/Deco PO2 threshold (Setting PO2 Thresholds).
The device prompts you to switch to the gas with the highest percentage of oxygen.
NOTE: The device does not switch gases for you automatically. You must select the gas.
Switching Between CC and OC Diving for a Bailout Procedure
During a closed-circuit rebreather (CCR) dive, you can switch between closed-circuit (CC) and open-circuit (OC) diving while you perform a bailout procedure.
- Start a CCR dive.
- Press ENTER.
- Select Switch to OC.
The dividing lines on the data screens turn red, and the device switches the active breathing gas to your OC decompression gas.
NOTE: If you have not set up an OC decompression gas, the device switches to your diluent gas.
- If necessary, press ENTER, and select Gas to manually switch to a backup gas.
- Press ENTER, and select Switch to CC to switch back to CC diving.
Performing a Safety Stop
You should perform a safety stop during every dive to help reduce the risk of decompression sickness.
- After a dive of at least 11 m (35 ft.), ascend to 5 m (15 ft.).
Safety stop information appears on the data screens.
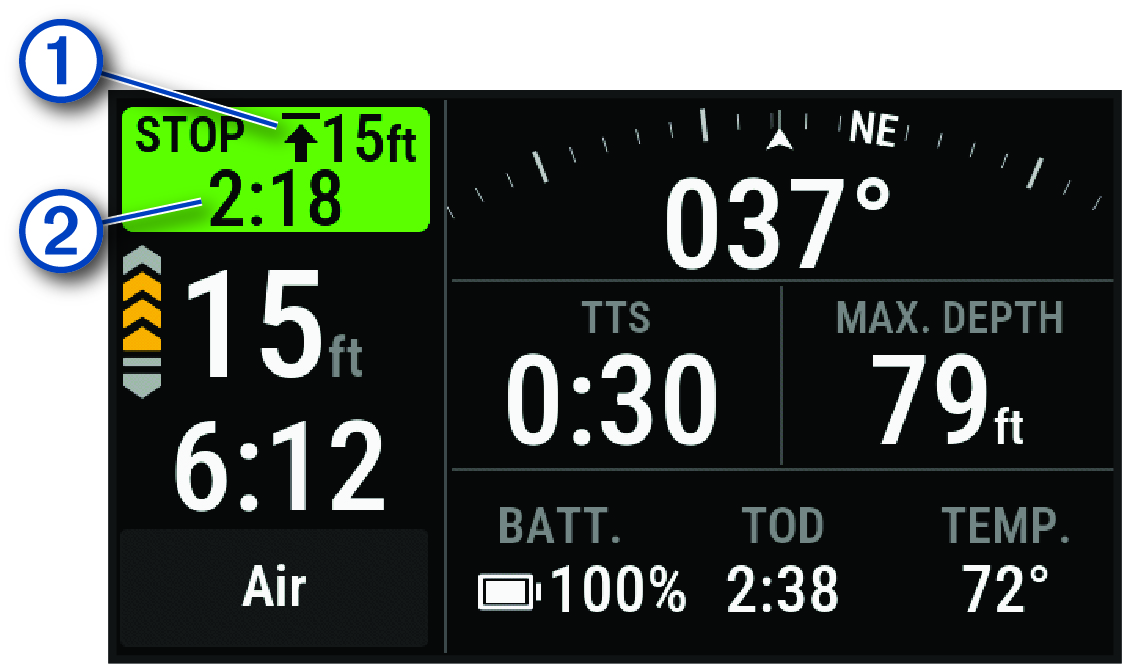
|
|
The safety stop ceiling depth. |
|
|
The safety stop timer. When you are within 1 m (5 ft.) of the ceiling depth, the timer starts counting down. |
- Stay within 2 m (8 ft.) of the safety stop ceiling depth until the safety stop timer reaches zero.
NOTE: If you ascend more than 3 m (8 ft.) above the safety stop ceiling depth, the safety stop timer pauses, and the device alerts you to descend below the ceiling depth. If you descend below 11 m (35 ft.), the safety stop timer resets.
- Continue ascending to the surface.
Performing a Decompression Stop
You should always perform all the required decompression stops during a dive to help reduce the risk of decompression sickness. Missing a decompression stop adds significant risk.
- When you exceed the no-decompression limit (NDL) time, begin your ascent.
Decompression stop information appears on the data screens.
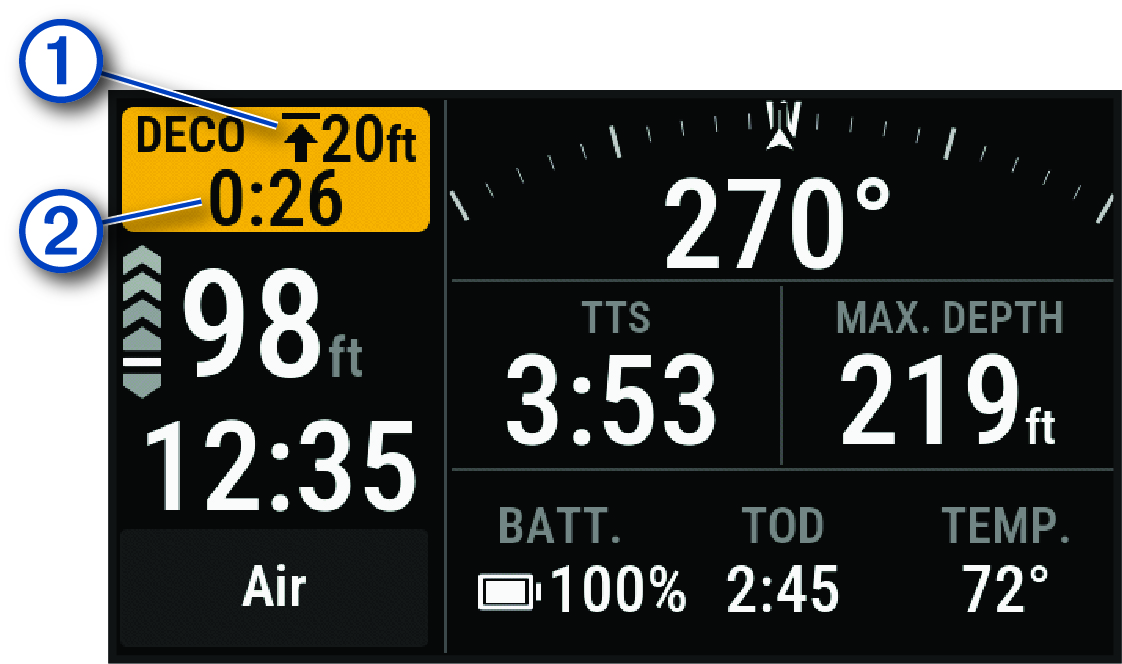
|
|
The decompression stop ceiling depth. |
|
|
The decompression stop timer. |
- Stay within 0.6 m (2 ft.) of the decompression stop ceiling depth until the decompression stop timer reaches zero.
NOTE: If you ascend more than 0.6 m (2 ft.) above the decompression stop ceiling depth, the decompression stop timer pauses, and the device alerts you to descend below the ceiling depth. The depth and ceiling depth flash red until you are within the safe margin.
- Continue ascending to the surface or the next decompression stop.
Viewing Your Dynamic Depth
During a gas dive, the dynamic depth data screen displays your depth profile for the dive so far, along with the projected ascent plan to the surface. The ascent plan shows required decompression steps or the safety stop (if configured), as well as upcoming gas switches and automatic set point switches.
- During a gas dive, press NEXT to view the dynamic depth data screen.
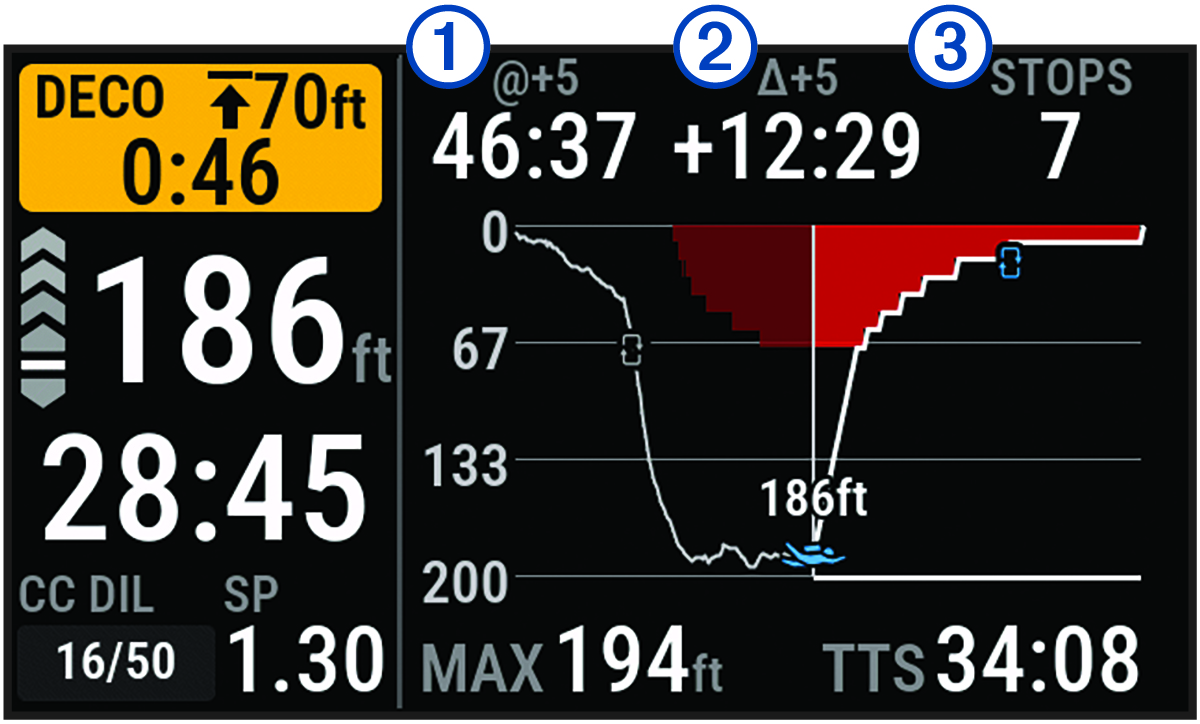
|
|
Your time to surface (TTS) if you remain at the current depth for five minutes. |
|
|
The difference between your TTS, and your TTS if you remain at the current depth for five minutes. |
|
|
Your upcoming stops. |