Connecting the Actuator to the Tiller Arm

To properly steer the vessel, you must connect the actuator to the tiller arm (not included).

  1. Install the tiller-pin connector on the actuator rod (Installing the Tiller-Pin Connector on the Actuator Rod).
  2. Install the tiller bolt in the tiller arm (Installing the Tiller Bolt and Connecting the Actuator Rod).
  3. Connect the actuator to the tiller arm.

Installing the Tiller-Pin Connector on the Actuator Rod

The tiller-pin connector hardware is included separately in the product packaging, and you must install it on the end of the actuator rod before you can connect the actuator to the tiller arm.

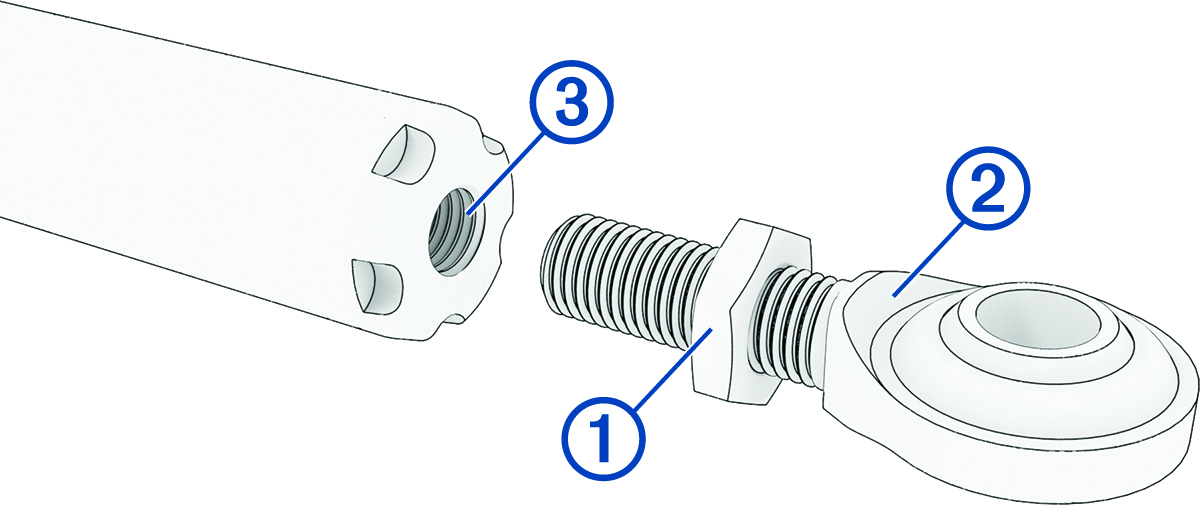
  1. Screw the 12 mm nut 1 onto the tiller-pin connector 2 until it stops.

    Tiller rod assembly with callouts
  2. Screw the assembled tiller-pin connector into the end of the actuator rod 3.

    For the most flexibility when adjusting the length, you should screw the pin into the rod until more than half of the threads are inside the rod.

    NOTICE

    You must engage at least six full threads when connecting the tiller-pin connector to the end of the actuator rod, so initially screwing it into the rod deeper than this provides more leeway when making fine adjustments. Engaging fewer than six full threads may damage the tiller-pin connector or actuator rod during use.

Installing the Tiller Bolt and Connecting the Actuator Rod

The supplied tiller bolt is suitable for tiller arm thickness of 12 to 16 mm (0.47 to 0.63 in.).

  1. Drill a 12.2 mm (0.48 in.) hole in the tiller arm 1 (not included) for the tiller bolt.

    Tiller pin installation with callouts
  2. Place the threaded end of the tiller bolt 2 into the tiller arm, and secure it with the M12 washer 3 and the M12 cap nut 4.

    It is recommended to apply LOCTITE® 638™, or an equivalent retaining compound, to the threads on the end of the tiller bolt to hold the cap nut in place during use.

  3. Apply general purpose marine grease to the unthreaded end of the tiller bolt.
  4. Adjust the actuator arm so it is at midstroke and place the tiller-pin connector 5 on the tiller bolt.
  5. Check for a 90-degree angle between the tiller arm and the actuator rod, and fine-tune the length of the actuator rod by screwing or unscrewing the tiller-pin connector to shorten or lengthen it as needed.
    NOTICE

    At least six full threads must be engaged when adjusting the tiller-pin connector on the end of the actuator rod. Engaging fewer than six full threads may damage the tiller-pin connector or actuator rod during use.

  6. After you finish fine-tuning the length of the actuator rod, tighten the 12 mm nut on the tiller-pin connector so it is snug against the actuator rod.
  7. Fasten the rod to the tiller bolt with the other M12 washer 6 and the locking R-pin 7.
  8. Place the included red tag on the R-pin using the hook-and-loop fastener.

    This tag helps indicate that you can quickly remove this pin and lift the actuator rod off of the pin to manually restore normal steering to the boat.

GUID-F8A3AF4C-44EB-477D-BF2E-2FE74EFB7B13 v1
September 2026