Fusion PartyBus Networking
The Fusion PartyBus™ networking feature allows you to connect multiple compatible stereos together on a network, using a combination of wired or wireless connections.
You cannot use Wi‑Fi® networking when a stereo is connected to a Garmin network.
For additional considerations when sharing sources, see the owner's manual.
You can use compatible stereos and remote controls, whether they are grouped or not, to adjust the volume of the available speaker zones for any stereo on the network.
You can connect up to eight Fusion PartyBus stereos on a network wirelessly.
Wired Networking Considerations
When you are planning your network installation, observe the following considerations for all wired connections.
-
This device uses Garmin BlueNet technology for wired network connections. For more information about Garmin BlueNet technology, including best practices for properly constructing a network that contains both Garmin BlueNet devices and legacy Garmin Marine Network devices, go to garmin.com/manuals/bluenet
-
If you are connecting this stereo to another stereo or device that has a Garmin BlueNet network port, you can use standard Garmin BlueNet cables (not included).
-
If you are connecting this stereo to another device that uses Legacy Garmin Marine Network cables, you should use a Garmin Marine Network to Garmin BlueNet network adapter cable (010-12531-11 or 010-13094-00, not included).
-
If you are connecting this stereo to another stereo or device that uses standard Ethernet port, you should use an RJ45 to Garmin BlueNet network adapter cable (010-12531-02, not included).
-
If you multiple chartplotters using a mix of Garmin BlueNet network and legacy Garmin Marine Network connections, you should connect this device to a Garmin BlueNet chartplotter or switch for the best performance.
-
For more information about Garmin BlueNet technology, go to garmin.com/manuals/bluenet
-
-
You can use one network cable to connect the stereo directly to a compatible device.
-
You must use wired network switches and wired or wireless network routers when you connect more than two compatible devices to a network.
-
If you install a router on the network, it should be configured to be a DHCP server by default. See your router instructions for more information.
-
If you do not install a router, and there are no other DHCP servers on the network, you should configure one Fusion PartyBus stereo to be a DHCP server (Setting the Fusion PartyBus Device as the DHCP Server).
Wired Network Example for Direct Connections
No network setting changes are needed when connecting two devices together directly, but for the best results, you should configure one device to be a DHCP server (Setting the Fusion PartyBus Device as the DHCP Server).
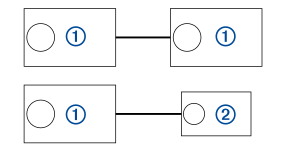
|
|
Fusion PartyBus stereo |
|---|---|
|
|
Fusion PartyBus zone stereo or remote control |
Wired Network Example with a Switch or Router
You must use wired network switches, a wired network router, or both to connect more than two devices.
If you have more than two devices using Garmin BlueNet network technology, you can use a Garmin BlueNet 20 switch to connect them.
If you did not install a router, and there are no other DHCP servers on the network, you should configure one Fusion PartyBus stereo to be a DHCP server (Setting the Fusion PartyBus Device as the DHCP Server). If you installed a router, you may need to configure it to be a DHCP server. See your router instructions for more information.
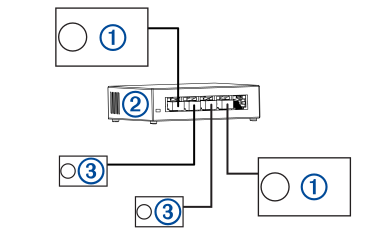
|
|
Fusion PartyBus stereo |
|---|---|
|
|
Wired network switch, wired network router, or Garmin BlueNet 20 switch |
|
|
Fusion PartyBus zone stereo or remote control |
Wireless Networking Considerations
When you are planning your network, observe the following considerations for all wireless connections.
-
Wired connections are more reliable than wireless connections. You should plan your network to use network cables, but if it is not possible, many Fusion PartyBus devices are Wi‑Fi compatible. You can connect them to wireless routers or access points.
-
If you install a wireless router on the network, it should be configured to be the DHCP server by default. See your wireless router instructions for more information.
-
If you are not using a wireless router, you can configure this device as a wireless access point, so you can connect other devices within wireless range.
NOTE: You should not configure this device as a wireless access point if you have a router installed on the network, because it may introduce DHCP conflicts and result in poor network performance. -
If you connect a Fusion PartyBus device to the network as a WI-FI CLIENT, you cannot connect any additional wired Fusion PartyBus devices to that device.
-
You can connect a smartphone to the wireless network to control any stereo on the network using the Fusion Audio app.
-
You can connect an Apple® device to the wireless network to stream media to multiple stereos on the network using Apple AirPlay® 2.
-
Connecting a Bluetooth® device to the stereo may interfere with some Wi‑Fi connections.
-
Wi‑Fi signals may interfere with Bluetooth device connections. You should turn off the Wi‑Fi setting on your stereo if you are not using it to connect to a wireless network or to provide a wireless access point.
Wireless Access Point Example
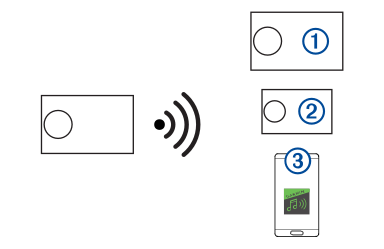
|
|
Fusion PartyBus stereo |
|---|---|
|
|
Fusion PartyBus zone stereo |
|
|
Mobile device using the Fusion Audio app |
Wireless Network Example with a Wired Switch or Router
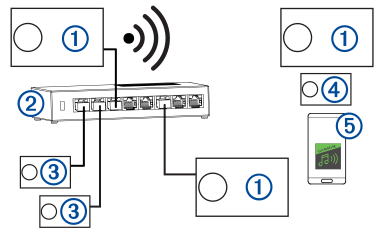
|
|
Fusion PartyBus stereo |
|---|---|
|
|
Wired network switch or wired network router |
|
|
Fusion PartyBus zone stereo or remote control |
|
|
Fusion PartyBus zone stereo |
|
|
Mobile device using the Fusion Audio app. |
Wireless Network Example with a Wireless Router or Access Point
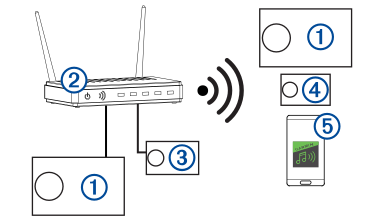
|
|
Fusion PartyBus stereo |
|---|---|
|
|
Wireless network router or wireless access point |
|
|
Fusion PartyBus zone stereo or remote control |
|
|
Fusion PartyBus zone stereo |
|
|
Mobile device using the Fusion Audio app |
Constructing a Network
You should have a basic understanding of networking when building a network for Fusion PartyBus devices.
These instructions guide you through the basics of building and configuring a network, and should apply to most situations. If you need to perform advanced networking tasks, such as assigning static IP addresses to devices on the network or configuring advanced settings on a connected router, you may need to consult a networking professional.
-
Test the network by selecting
 > GROUPS to view a list of devices connected to the on the network, and select an option:
-
If any Fusion PartyBus devices are not available to the network, troubleshoot the network (Network Troubleshooting).
-
If all Fusion PartyBus devices are available on the network, complete the installation for each stereo, if necessary.
-
Network Configuration
Setting the Fusion PartyBus Device as the DHCP Server
If you connected more than two network devices together using a network switch or wireless access point but you did not install a router, you should configure only one Fusion PartyBus stereo to be a DHCP server.
Having more than one DHCP server on the network causes instability and poor performance for all devices on the network.
-
If the device is connected to the network using an Ethernet cable, select
> SETTINGS > NETWORK > WI-FI OFF.
- If the device is connected to the network using an Ethernet cable, select .
- Select .
Connecting the Stereo to a Garmin Network
You cannot use Wi‑Fi networking to connect to a Garmin chartplotter, nor can you use Wi‑Fi networking on the stereo when it is connected to a Garmin chartplotter using a wired network connection.
You can connect this stereo to a Garmin BlueNet network or a Garmin Marine Network in order to view and control the stereo using a compatible Garmin chartplotter.
This stereo is compatible with both Garmin BlueNet devices and Garmin Marine Network devices. You can connect the stereo to either type of network, but if you have multiple stereos, they should all be connected to one network type or another.
For more information about Garmin BlueNet technology, including best practices for constructing a network including both Garmin BlueNet devices and Garmin Marine Network devices, go to garmin.com/manuals/bluenet.
- Determine the best device on the Garmin BlueNet network or the Garmin Marine Network to which you should connect the stereo.
-
Select an option:
-
To connect the stereo to a Garmin BlueNet device, use a Garmin BlueNet cable (not included).
-
To connect the stereo to a Garmin Marine Network device, use a Garmin Marine Network to Garmin BlueNet network adapter cable (010-12531-11 or 010-13094-00, not included).
-
Setting the Fusion PartyBus Device as a Wireless Access Point
Before you can connect additional Fusion PartyBus devices or smartphones to a Fusion PartyBus device wirelessly, you must configure one device as a wireless access point. This is not necessary if you installed a wireless router or other wireless access point on the network.
You should not configure this device as a wireless access point if you have a router installed on the network. Doing so may introduce DHCP conflicts and result in poor network performance.
For more detailed configuration instructions, see the owner's manual.
-
Select
> SETTINGS > NETWORK > WI-FI ACCESS POINT.
-
Select
> SETTINGS > NETWORK > ADVANCED > WI-FI AP SETTINGS > PASSWORDand enter a password for the wireless access point.
Connecting the Fusion PartyBus Device to a Wireless Access Point
You can connect this device to a wireless access point on a router or compatible Fusion PartyBus device on the network. This device can connect using Wi‑Fi Protected Setup (WPS), if it is supported by your access point. This device can connect using Apple Accessory Configuration (WAC) using a supported Apple device.
-
Select
> SETTINGS > NETWORK > WI-FI CLIENT > SSID.
A list of wireless access points within range appears.
-
If necessary, select
PASSWORD, enter the password, and select
 .
.
Resetting Network Settings
You can reset all network settings for this stereo to the factory default values.
-
Select
> SETTINGS.
- Select .
Advanced Network Configuration
Network Troubleshooting
If you cannot see or connect to Fusion Apollo devices on the network, perform these steps.