Mounting Considerations
In high ambient temperatures and after extended use, the rear portion of the device enclosure may reach temperatures deemed dangerous to touch. To avoid possible personal injury, the device must be installed in a location where only the face is accessible to users and the rear portion cannot be touched during operation.
This device should be mounted in a location that is not exposed to extreme temperatures or conditions. The temperature range for this device is listed in the product specifications. Extended exposure to temperatures exceeding the specified temperature range, in storage or operating conditions, may cause device failure. Extreme-temperature-induced damage and related consequences are not covered by the warranty.
-
You must mount the stereo on a flat surface.
-
You must mount the device in a location with adequate ventilation so it does not trap heat.
-
When installed properly using optional marine sealant, the stereo is water resistant from the front. The connectors on the back are not water resistant, so you must not install the stereo in a location where the back may become submerged or regularly exposed to water.
-
If you are installing the stereo in a location that may be exposed to water on occasion, you must mount it within 45 degrees below or 15 degrees above the horizontal plane.
-
If you are installing the stereo in a location that may be exposed to water on occasion, you must add a drip loop to the cable to allow water to drip off of the cable and avoid damage to the stereo.
-
If you need to mount the stereo on the outside of the boat, you must mount it in a location far above the waterline, where it is not submerged, and where it cannot be damaged by docks, pilings, or other pieces of equipment.
-
To avoid interference with a magnetic compass, you should mount the stereo at least 40 cm (15.75 in.) away from a compass.
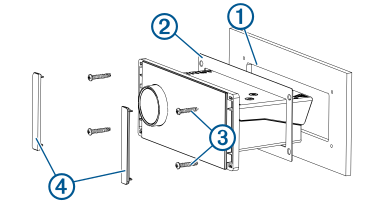
Mounting the Stereo
Do not use the stereo as a template when drilling the mounting holes because this may damage the display and void the warranty. You must only use the included template to correctly drill the mounting holes.
Be careful when cutting the hole to mount the stereo. There is only a small amount of clearance between the case and the mounting holes, and cutting the hole too large could compromise the stability of the stereo after it is mounted.
Do not apply grease or lubricant to the screws when fastening the stereo to the mounting surface. Grease or other lubricants can cause damage to the stereo housing.
Before you can mount the stereo in a new location on the mounting surface, you must select a location in accordance with the mounting considerations.
-
Cut the mounting surface along the inside of the dashed line on the template.