Compass Settings
From the compass, select  .
.
Sight ‘N Go: Allows you to point the device at an object in the distance, and navigate using the object as a reference point (Navigating with Sight ‘N Go).
Stop Navigation: Stops navigation of the current route.
Change Dashboard: Changes the theme and information displayed on the dashboard.
Set Scale: Sets the scale for the distance between the dots on the course deviation indicator when navigating with Sight ‘N Go.
Calibrate Compass: Allows you to calibrate the compass if you experience irregular compass behavior, for example, after moving long distances or after extreme temperature changes (Calibrating the Compass).
Heading Setup: Allows you to customize the compass heading settings (Heading Settings).
Lock Data Fields: Locks the data fields. You can unlock the data fields to customize them.
Restore Defaults: Restores the compass to factory default settings.
You can point the device at an object in the distance with the compass direction locked in, project the object as a waypoint, and navigate using the object as a reference point.
- From the compass, select > Sight ‘N Go.
- Point the device at an object.
- Select Lock Direction > Set Course.
- Navigate using the compass.
Projecting a Waypoint from Your Current Location
You can save a new waypoint by projecting the distance from your current location.
For example, if you would like to navigate to a location you observe on the other side of a river or stream, you can project a waypoint from your current location to the observed location, and then navigate to the new location after you cross the river or stream.
- From the compass, select > Sight ‘N Go.
- Point the device at the new location.
- Select Lock Direction > Project Waypoint.
- Select a unit of measure.
- Enter the distance, and select
 .
. - Select Save.
Before you can calibrate the electronic compass, you must be outdoors, away from objects that influence magnetic fields, such as cars, buildings, or overhead power lines.
The device has a 3-axis electronic compass. You should calibrate the compass after moving long distances or experiencing temperature changes.
- From the compass, select .
- Select Calibrate Compass > Start.
- Follow the on-screen instructions.
From the compass, select , and select Heading Setup.
Display: Sets the type of directional heading shown on the compass.
North Reference: Sets the north reference used on the compass.
Go To Line (Pointer): Sets the behavior of the pointer that appears on the map. Bearing points in the direction of your destination. Course (CDI) shows your relationship to the course line leading to the destination.
Compass: Automatically switches from an electronic compass to a GPS compass when you are traveling at a higher rate of speed for a period of time.
Calibrate Compass: Allows you to calibrate the compass if you experience irregular compass behavior, for example, after moving long distances or after extreme temperature changes (Calibrating the Compass).
Course Pointer
The course pointer is most useful when you are navigating to your destination in a straight line, such as when you are navigating on water. It can help you navigate back to the course line when you go off-course to avoid obstacles or hazards.
To enable the course pointer, from the compass, select > Heading Setup > Go To Line (Pointer) > Course (CDI).
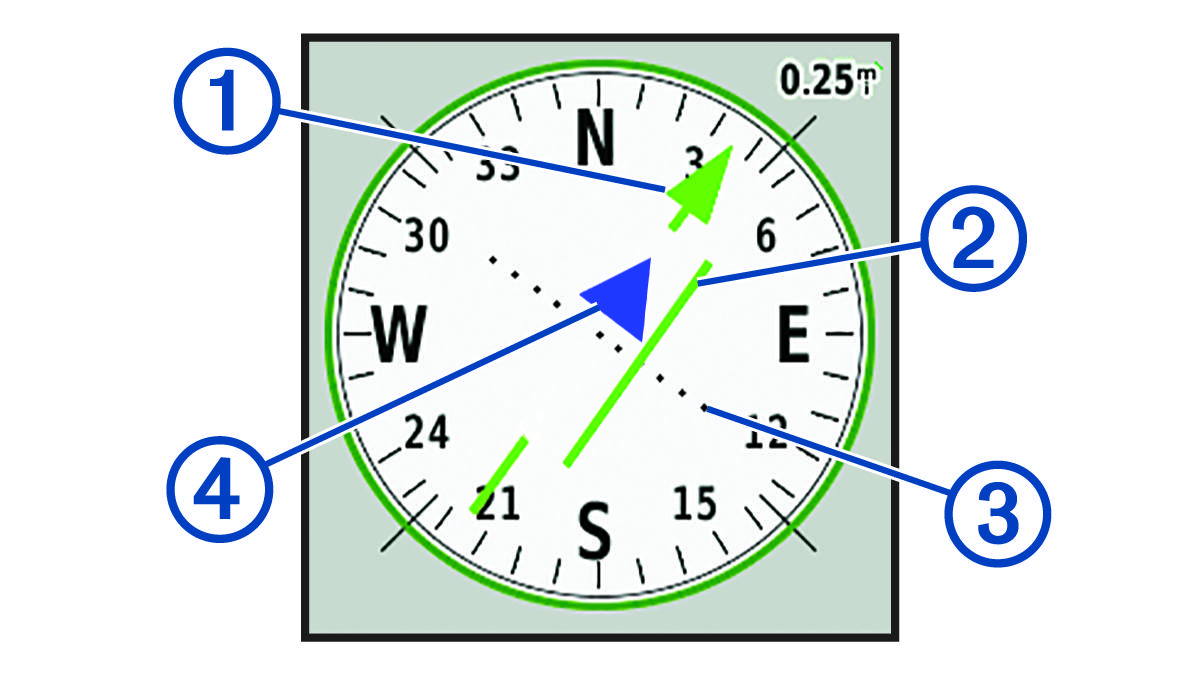
|
|
Course line pointer. Indicates the direction of the desired course line from your starting point to your next waypoint. |
|
|
Course deviation indicator (CDI). Indicates the location of the desired course line in relation to your location. If the CDI is aligned with the course line pointer, you are on course. |
|
|
Course deviation distance. The dots indicate your distance off course. The distance represented by each dot is indicated by the scale in the upper-right corner. |
|
|
To-and-from indicator. Indicates whether you are headed to or from the next waypoint. |


